
The Arduino's greatest weakness is also it's greatest triumph. That is, it is only a low power simple processor, which makes internet connectivity for such a simple device difficult. Often the network interface has a few orders of magnitude greater performance than the arduino atmel avr processor itself.
Arduino Yun is the answer to wifi connectivity for arduino. Ushering in a new era known as the internet of things, Yun is actually a complete 400mhz system on chip. There is irony in the fact that the powerful system on chip's only duty is to serve the lowly AVR. Akin to "You Pass Butter"
Anyhow - today we are going to be looking at some simpler, lower power alternatives to adding wifi to your arduino project. For about 11 bucks you can grab a USR-WIFI232-T from ebay shipped direct from china. And this typically includes an omnidirectional antenna with a U.FL connector! As with most of these Chinese components, who actually manufactures them is murky. I purchased two variants, one from Ebay under the model USR-WIFI232-T (Specs / Mirror) and one from a US distributor Grid Connect under the name and model Hi Flying HF-LPT100 (Specs / Mirror)
These devices provide UART Wifi. This means everything is done over serial. This introduces several limitations such as transfer performance and simultaneous connections. The specs claims capability of 5 simultaneous connections, but in reality they are not 5 separate TCP sessions. All of the connections receive the same data back from the server. This means you can't have 5 people accessing a web interface each trying to navigate to a different page. Suffice to say - these modules are for simple tasks.
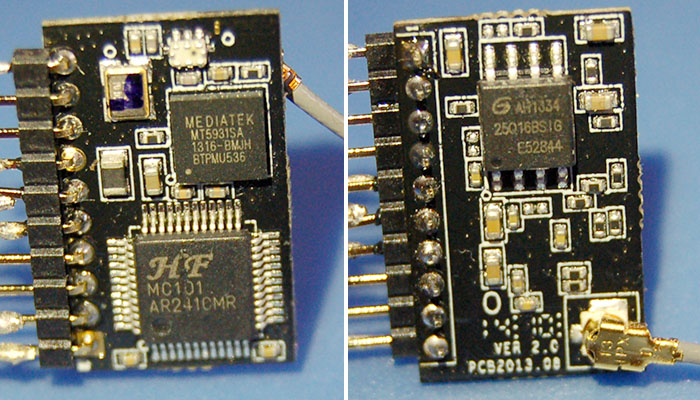
It appears that Hi Flying is the actual developer of this device. As claimed on their website from their own "Highly Cost Effective With High-Flying MCU: MC101". No matter if it's Hi Flying or USR, they are all devices based off the Mediatek MT5931 (Specs / Mirror)
Below the MediaTek AC is the High Flying MC101. This is likely a simple ARM CPU. The SDK reveals that this is an arm architecture running FreeRTOS and lwIP. On the reverse of the board is a 16Mbit SPI flash chip from GigaDevice for firmware storage.
Connect the Ground and 3.3V to power up the unit. The module can be powered directly from the arduino 3.3v pin.


Don't be fooled by the seemingly convenient single row pin header. This is not breadboard compatible due to the 1.27 mm pin spacing. You will need to solder some wires on like I did, or use a fine pitch cable to connect this device to a standard 2.54mm spaced breadboard.
For the Arduino Micro you can connect the device to the Tx and Rx pins for up to 115200 UART TTL Serial with simultaneous COM debugging over USB. This is possible because the ATmega32u4 contains embedded USB.

For the Arduino UNO if you want to debug over USB COM and connect to the device using soft serial, you must use the AltSoftSerial library and lower the bitrate to 9600. This was the only way I was able to use bit banged serial. But it worked great!

Upon first power up, you will see the device broadcast an unsecured wifi SSID named HF-LPB100.


Connecting to the default gateway IP address yields the configuration web page. There is a password prompt which the user and pass is admin / admin. By default the language is Chinese. You can change it to english with the link in the upper left.


The device can operate in Access Point (AP), Station (STA), or Both Simultaneously (AP+STA)

From the "STA Setting" page you can scan for wifi networks and easily link the device. One you select the device it seems to auto fill the authentication and encryption type and all you have to enter is the key.
After you save the STA settings, you have to reset the device.


You can customize all of the parameters for the access point.

The serial UART configurations can also be changed from here. During my testing using the Arduino default SoftSerial library I was only able to access the device reliably using 9600 bps. Using the AltSoftSerial I was able to increase the bitrate to 115200. Ultimately the best solution is to use the hardware UART - this just makes debugging more difficult however. The Arduino Micro is the best solution due to the separate USB and Hardware UARTs.

You can change the default user login here. This is great because by default you can setup just enough security on the device right out of the box to prevent any casual attacks.

There is a firmware upgrade page, and it appears that Hi Flying has released a few firmware updates. The device shipped with firmware version 1.0.04a, but there is a 1.0.05 available for download. The release notes are in Chinese and seem to indicate many improvements across the board.

There are two versions of the code in the Examples folder. One for the Arduino Uno - ArduinoUnoBasicCommandsExample, and one for the Arduino Micro - ArduinoMicroBasicCommandsExample. Keep in mind you will have to install the AltSoftSerial library first.
This code allows you to connect to the wifi module and run a few useful predefined command sequences, or you can type into the console to send your any command directly to the unit. Keep in mind that if you send any command with a number in it- the corresponding predefined command may get ran in the middle of yours. When this happens it is obvious since you see all the output on the serial monitor.
Open the Serial Monitor and set it to "No Line Ending". Next you can enter the numbers 1-9 on your keyboard to perform the following command sequences.
| Number | Command |
| 1 | 1 Enter CMD Mode, sending +++ then a |
| 2 | 2 Check For CMD Mode, sending AT+ |
| 3 | 3 Show Help, sending AT+H |
| 4 | 4 Scan for Wifi, sending AT+WSCAN |
| 5 | 5 Connect Wifi |
| 5.1 Setting Wireless mode to AP+STA, sending AT+WMODE=APSTA | |
| 5.2 Setting Wifi STA SSID, sending AT+WSSSID= | |
| 5.3 Setting STA Wifi Key, sending AT+WSKEY= | |
| 5.4 All Settings Saved Rebooting, sending AT+Z | |
| 6 | 6 Set IP to DHCP, sending AT+WANN=DHCP |
| 6.1 Setting Saved Rebooting, sending AT+Z | |
| 7 | 7 Set IP to STATIC, sending AT+WADHCP=static |
| 7.1 Setting DNS, sending AT+WSDNS= | |
| 7.2 Setting Saved Rebooting, sending AT+Z | |
| 8 | 8 Ping Google.com, sending AT+PING=google.com |
| 9 | 9 Send HTTP Request on Socket B |
The wifi module can operate in a few different modes. The default mode is pass through mode. This means all the data from the connected client gets passed through the UART, and likewise anything you send over the UART is sent to the client.
The device can be switched to command mode by sending three plus signs with a slight delay between them, and the UART will respond with an "a". Then you must respond with an "a" and you will see the device enter command mode with a "+ok" response. If you want to send and receive data, you can use a feature called "Socket B" which allows a secondary outbound connection to be made. In the command examples above - Socket B is utilized to download a web page from google.com
Waveshare sells a board, the WIFI400, that you can link up to the wifi unit connecting status LEDs and switches for power reset and factory settings reset functionality. The board is particularly useful because the HF-LPT100 has a pin pitch of 1.27mm, which is not compatible with standard arduino 2.54mm spacing breadboards.
You can purchase the HF-LPT100 and WIFI400 board from Amazon for $26 with free shipping. Keep in mind this is shipped direct from China. Or just the board for $12.
The complete kit came with everything you see here, the wifi module, the break out board, antenna with u.fl connector, and even the nuts and bolts pictured below.


Power consumption appears to be low. I'm looking to purchase the INA219 current sensor from adafruit to do some exact measurements in the same vein as the adafruit Low Power WiFi Datalogger tutorial.
Anecdotally, I was able to log temperatures from 2 one-wire digital temperature sensors logging once per minute powered by 6 x AA rechargeable batteries for about 10.5 hours. The sensor rig is detailed in my other article Arduino_Wifi_Temp_Logger This appears to be better resulrs than the adafruit article where they claimed about 6 hours. This isn't a very valuable comparison since they were logging the results from a photocell and used the CC3000 wifi module, however it is an interesting benchmark.
From the Specs:
| Operating Current | |
| Peak [Continuous TX]: | ~200mA |
| Normal [WiFi ON/OFF, DTIM=100ms]: | Average. ~12mA, Peak: 200mA |
| Standby [WiFi Shutdown]: | <200uA |
| Power Down Switch: | <10uA |
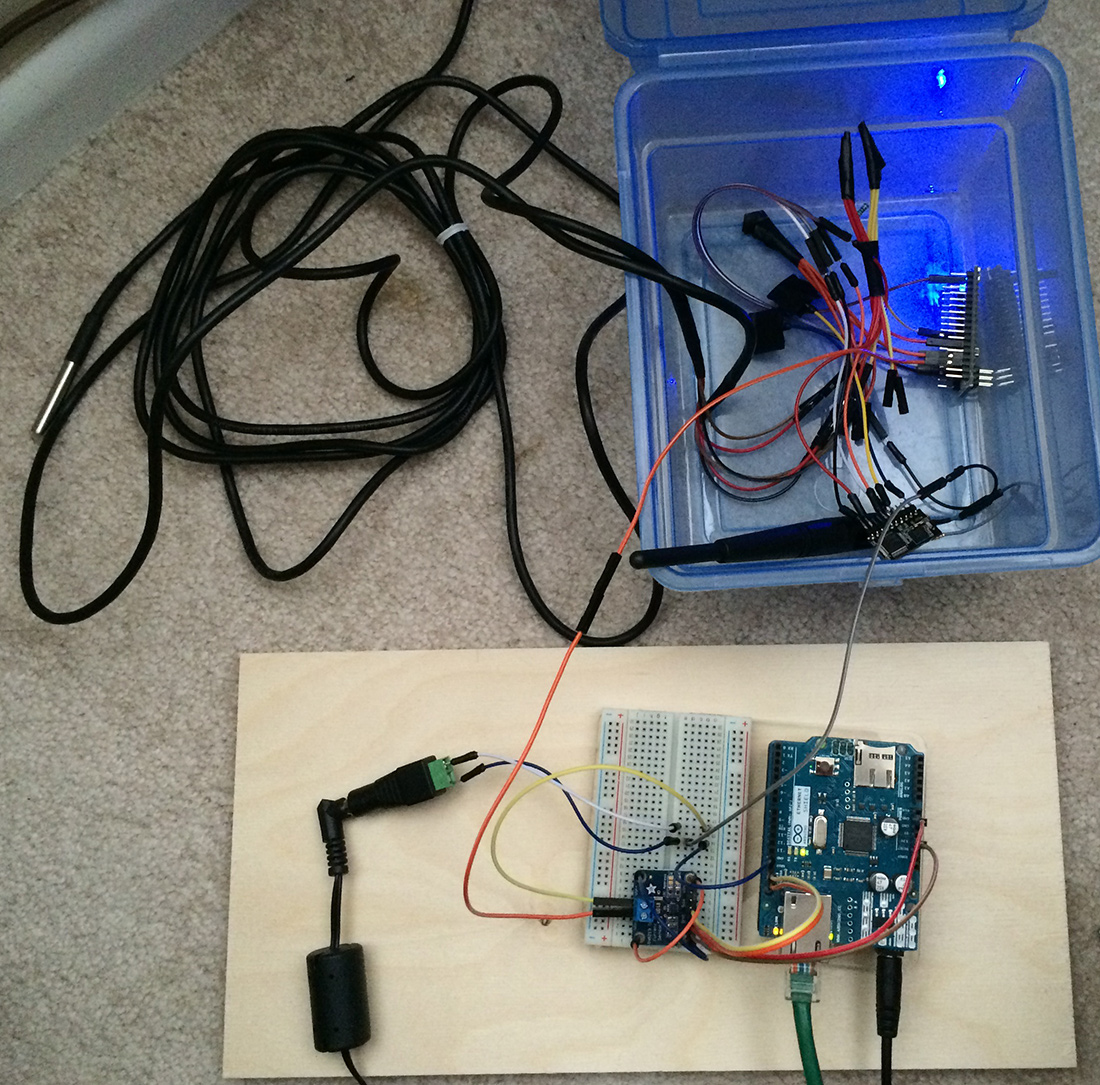
Using the INA219 current sensor from adafruit, actual current consumtion measured on the wifi temp logger system (Arduino Nano, 2x Dallas temp probes, and the HF-LPT100 unit) is on average 60.4 mA. This is with absolutely no power optimizations to decrease the current consumption for the arduino or wifi module.
Next Up! Comparing the Espressif ESP8266 against the HF-LPT100 in the same temperature logging scenario!
I am still unsure about the relability of these wifi devices. Every time I setup my temperature logger it will seem to stop logging after about 2 days. I'm not sure if this is due to my cats or the chips. The results are unconclusive as I don't have anything mounted in a proper enclosure.
2014-11-06 Update! As of today have successfully been logging temperatures every minute for nearly 2 weeks. I think my previous relability issues were caused by bad connections due to my setup not being mounted in a proper enclosure. This unit is rock solid!
The promise of adding wifi to an arduino project for $11 is quite tantalizing! The Hi Flying HF-LPT100 / USR WIFI232-T products are a great cost effective and low power method for adding wifi to your Arduino or basic embedded project. At $11 it is the second cheapest wifi module out there. The ESP8266 is the only cheaper alternative, but it is still far off from the $40 for a CC3000 module.
2014-10-06 Published
2014-10-10 Github code added
2014-10-24 Added WIFI400 info
2014-10-27 Added more detailed web interface descriptions
2014-11-06 Relability Update
2014-11-07 Power Consumption Update
2014-11-10 Added Arduino Uno Code